How to create a contact form with AWS Lambda backend
You want a simple form where people can send you an email.
(you probably want a more beautiful form than that, but hey I’m not a designer.)
And because you use a JAM stack you don’t have a backend. So what do you do? You have several options.
The first option that comes to mind is to use a SaaS. There are many to choose from. Here are some of the biggest and each of them has their drawbacks:
- Zapier It’s really easy to set up an email flow. But the downside is that it cost money with the webhook integration (currently $19/month). There are other services similar to Zapier which all cost money. All these SaaS expenses add up.
- Google Form embedded with iFrame. It doesn’t use your look and feel of your site.
- Some random services you find when Googling that you never heard of before. Can you trust them with your data? I don’t.
So what do you do? Code it yourself of course. For a JAM stack with no backend, a AWS Lambda can be a good fit.
With a Lambda you don’t need to spend time setting up servers, etc. In theory, you just write the JS code and you’re good to go.
In practice, there is some work to do. Let’s go through step by step what you need to do.
Many cloud platforms support Lambda. In this article, I’m going to use AWS.
This is quite a long article. This is an overview of the key things you’ll learn:
- Limitations of this article
- Prerequisites
- AWS Lambda pricing
- The plan for today
- Create the Lambda function
- Write the code for sending emails with SES (Simple Email Service)
- Set up execution roles and policies for the Lambda
- Verify a sender’s email in SES
- Add an API Gateway to the Lambda
- Access data in the Lambda from the API Gateway
- Post data from the form to your Lambda
- Next steps
Limitations of this article
Were going to use the AWS console which is the UI interface to AWS. You’re going to do a lot of clicking. I think this is a great way to get started with AWS. For larger applications, one usually uses infrastructure as code (IaC). With such a tool, you write the configuration in code. That could be the next step to learn after this tutorial if you want to deepen your AWS skills. Commonly used IaC tools are CDK and Terraform
Another limitation with this article is that we’re not going to implement any spam protection. You probably want this for applications with lots of traffic. A common tool for spam protection is CAPTCHA
Prerequisites
You’ll need an AWS account.
AWS Lambda pricing
An important aspect of evaluating a solution is the cost. Developing an AWS Lambda is cheap but it’s not free. Let’s have a closer look at what it costs.
With AWS in general you only pay for what you use. This also applies for Lambdas. This means that if you create your Lambda and deploy your code, but you never have anyone using it, then you don’t pay anything for it. This is great, especially if you are using it for learning.
So what does it cost when we use it? Let’s have a look at the AWS Lambda pricing page
It says: “Free Tier: 1 million requests per month, 400,000 GB-seconds of compute time per month ”
So your users can make 1 million requests to your lambda every month. And up to 400,000 “GB-seconds”. After this threshold, you will start being charged. GB-seconds means multiplying the time your Lambda runs with the amount of RAM memory the lambda consumes. So if your Lambda runs for 3 seconds and it consumes 4 GB of RAM in that period, it consumes a total of 3*4=12 GB-seconds.
I would say that this free tier is generous. Most smaller applications you will inside the free tier.
After the free tier, you will pay $0.20 per 1 million requests and $0.00001667 for every GB-second used. The costs for Lambdas are quite low in my opinion.
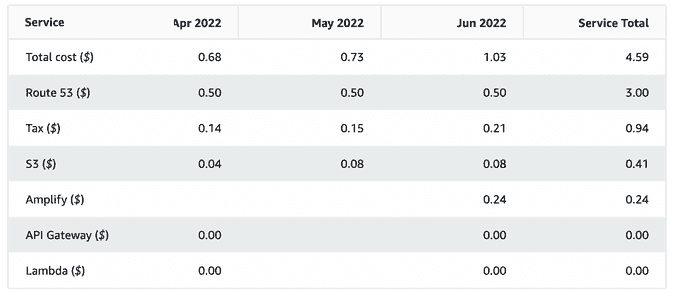
You can follow the costs closely in the AWS cost explorer. Let’s have a look at the cost explorer for my account. I run one Lambda that has roughly 5-50 requests per month. I also have some S3 buckets serving PDFs and other static files to users of my blog and email list.
As expected, the Lambda costs are $0 and also costs for API gateway are $0 (you’ll learn API gateway later in this article).
The plan for today
The use case is that you want a form on your JAM stack web app where a user can enter their name, a message, and their email so you can get back to the user.
Sorry again for that ugly form! At least we will make it work.
The code for the form looks like this (we’ll write the sendForm function at the end of the article):
function ContactForm() {
  const name = useRef(null)
  const email = useRef(null)
  const message = useRef(null)
  return (
    <div>
      <form
        onSubmit={(e) => {
          e.preventDefault()
          sendForm(
            name.current.value,
            email.current.value,
            message.current.value
          )
        }}
      >
        <input type="text" name="name" ref={name} placeholder="name" />
        <br />
        <input type="text" name="email" ref={email} placeholder="email" />
        <br />
        <textarea name="message" ref={message} placeholder="message" />
        <br />
        <button type="submit">hello</button>
      </form>
    </div>
  )
}
When a user submits the form you want all the information available to you as an email. We are going to do that by making the form call a Lambda function.
Let’s create that Lambda function!
Create the Lambda function
Log into the AWS console, then search for Lambda at the top and click the Lambda in the search results
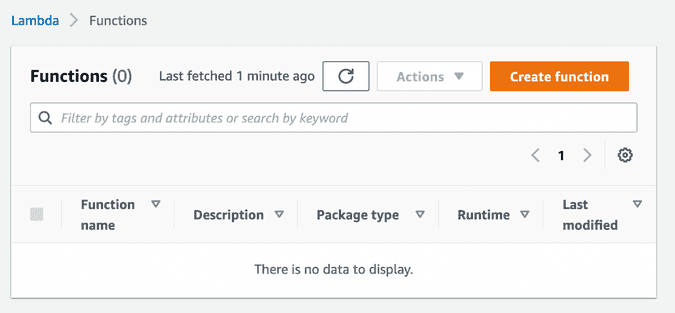
Now you’re inside the Lambda page which shows you an overview of all your Lambda functions (which is an empty list if you just created your AWS account)
To create a new Lambda, click the orange Create function button. This will start a wizard for creating your Lambda function.
Use the preselected “Author from scratch”. This gives us a “hello world” Lambda function which is a good starting point for building our function.
Enter a function name. I used send-email. Leave all other fields with the default value. Then press the orange button Create function at the bottom right. Now you have to wait a minute or two while AWS creates your function. When it is completed it redirects you to the page for your newly created function.
This page gives you an overview of all the information related to your function. If you scroll down a little bit, you’ll see the boilerplate code for the “Hello world”-app that AWS has created for you.
Lambda means anonymous function. And as you can see, that’s exactly what it is. This function returns a JSON structure that specifies an HTTP status code and a body.
Let us test the Lambda! Press the orange Test button just above the code. Now you get a pop-up that lets you create some test configuration.
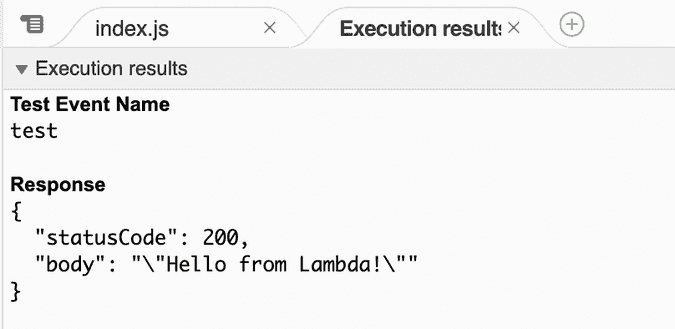
The only field you need to fill out is the name. I picked the name “test”, but you can give it any name you want. Keep all other fields the defaults. Then click Save at the bottom right. Now you have a test configuration set up. Press the orange Test button again. This time it will run a test with the test configuration you just created.
It will show you the output “Hello from Lambda” and some other metadata.
Our Lambda will do more than printing a “hello world”-message when we’re done with this article. Let us write the code for sending emails.
Write the code for sending emails with SES (Simple Email Service)
To send the emails we are going to use an AWS service called SES (Simple Email Service). Copy the following code and paste it into the Lambda code editor. Remember to change the YOUR-EMAIL with your email address.
var aws = require("aws-sdk")
var ses = new aws.SES({ region: "eu-west-1" })
exports.handler = async function (event) {
  var params = {
    Destination: {
      ToAddresses: ["YOUR-EMAIL"],
    },
    Message: {
      Body: {
        Text: { Data: "Test" },
      },

      Subject: { Data: "Test Email" },
    },
    Source: "YOUR-EMAIL",
  }

  return ses.sendEmail(params).promise()
}
Click the Deploy button next to the Test button. Then click Test to run the Lambda and enjoy the output.
Wait, There’s an error. hm…
{
  "errorType": "AccessDenied",
  "errorMessage": "User `arn:aws:sts::661320411194:assumed-role/send-email-role-s8vog373/send-email' is not authorized to perform `ses:SendEmail' on resource `arn:aws:ses:eu-west-1:661320411194:identity/YOUR-EMAIL'",
  "trace": [
    "AccessDenied: User `arn:aws:sts::661320411194:assumed-role/send-email-role-s8vog373/send-email' is not authorized to perform `ses:SendEmail' on resource `arn:aws:ses:eu-west-1:661320411194:identity/YOUR-EMAIL'",
    "    at Request.extractError (/var/runtime/node_modules/aws-sdk/lib/protocol/query.js:50:29)",
    "    at Request.callListeners (/var/runtime/node_modules/aws-sdk/lib/sequential_executor.js:106:20)",
    "    at Request.emit (/var/runtime/node_modules/aws-sdk/lib/sequential_executor.js:78:10)",
    "    at Request.emit (/var/runtime/node_modules/aws-sdk/lib/request.js:686:14)",
    "    at Request.transition (/var/runtime/node_modules/aws-sdk/lib/request.js:22:10)",
    "    at AcceptorStateMachine.runTo (/var/runtime/node_modules/aws-sdk/lib/state_machine.js:14:12)",
    "    at /var/runtime/node_modules/aws-sdk/lib/state_machine.js:26:10",
    "    at Request.<anonymous> (/var/runtime/node_modules/aws-sdk/lib/request.js:38:9)",
    "    at Request.<anonymous> (/var/runtime/node_modules/aws-sdk/lib/request.js:688:12)",
    "    at Request.callListeners (/var/runtime/node_modules/aws-sdk/lib/sequential_executor.js:116:18)"
  ]
}
Access Denied. The Lambda doesn’t have access to SES. Let’s give it access.
Set up execution roles and policies for the Lambda
AWS is very concerned with security, which is nice. But for small projects like this, it’s a bit painful. Don’t give up, we’re almost there! Let’s assign the policy to the Lambda.
On the Lambda page, click the Configuration tab, and then Permissions in the left menu. At the top of the page you see the Execution role:
Click the link under Role name (in my case the link says send-email-role-s8vog373). This will take you to the IAM page for the role that your Lambda has. Here we are going to create a new policy document and attach it to the role. Click Add permissions button at the right, and then Create inline policy.
Click the JSON tab and paste in the following JSON document.
{
  "Version": "2012-10-17",
  "Statement": [
    {
      "Effect": "Allow",
      "Action": ["ses:SendEmail", "ses:SendRawEmail"],
      "Resource": "*"
    }
  ]
}
Press the button Review policy. Now enter a name in the Name field. I called it “ses”. Press Create policy. Now the policy should have been added to the role.
Now go back to the Lambda, and press the Test button. Now it should work, right?
Another error emerges:
{
  "errorType": "MessageRejected",
  "errorMessage": "Email address is not verified. The following identities failed the check in region EU-WEST-1: YOUR-EMAIL",
  "trace": [
    "MessageRejected: Email address is not verified. The following identities failed the check in region EU-WEST-1: YOUR-EMAIL",
    "    at Request.extractError (/var/runtime/node_modules/aws-sdk/lib/protocol/query.js:50:29)",
    "    at Request.callListeners (/var/runtime/node_modules/aws-sdk/lib/sequential_executor.js:106:20)",
    "    at Request.emit (/var/runtime/node_modules/aws-sdk/lib/sequential_executor.js:78:10)",
    "    at Request.emit (/var/runtime/node_modules/aws-sdk/lib/request.js:686:14)",
    "    at Request.transition (/var/runtime/node_modules/aws-sdk/lib/request.js:22:10)",
    "    at AcceptorStateMachine.runTo (/var/runtime/node_modules/aws-sdk/lib/state_machine.js:14:12)",
    "    at /var/runtime/node_modules/aws-sdk/lib/state_machine.js:26:10",
    "    at Request.<anonymous> (/var/runtime/node_modules/aws-sdk/lib/request.js:38:9)",
    "    at Request.<anonymous> (/var/runtime/node_modules/aws-sdk/lib/request.js:688:12)",
    "    at Request.callListeners (/var/runtime/node_modules/aws-sdk/lib/sequential_executor.js:116:18)"
  ]
}
Don’t get discouraged! It’s a new error message which means we got one step closer. Let’s take a closer look at it. It says “Email address is not verified”. SES requires us to verify the sender’s email to prove we are the owner of the email that were are sending emails from. Let’s do that!
Verify a sender’s email in SES
Before we start verifying the sender’s email we’re going to spend a moment to reflect on what that means. Just to remind you, the use case we are implementing is that you want an end-user to enter a name, a message, and an email address in the form on your web page. When he or she presses the send button, it will trigger our Lambda. This Lambda function will send an email to you with the content of the form. Who will be the sender of this email? It will also be you. Because we can only send emails from emails that we own ourselves. And we must prove to AWS that we own it. And that is what we are going to do now.
Ok, now let’s get going.
Go to the SES console in AWS. In the left menu, click Verified identities under Configuration. Now you enter a new page with an overview of your verified identities (which currently is none). To add a new one, click the orange button Create Identity.
Here you have two options, either Domain or Email address. If you verify a domain, you can send emails from any address with that domain. But we’re not going to that now. We’ll go for an email address instead. Enter the address of the email you intend to send emails from. Note that you must have access to the inbox of this email. Then press Create identity. Now you get an email from AWS in your inbox with a link that you must click to verify your email. Do that now.
After you have verified your email, go back to your Lambda function and press Test again. Now you should have a response that looks something like this:
Response
{
  "ResponseMetadata": {
    "RequestId": "0d21011e-da23-4535-8936-b4fedac030c0"
  },
  "MessageId": "010201814c9556c1-8f97bd0e-5725-451c-aec2-58b064e7b7b0-000000"
}
And you should also have an email (from yourself) in your inbox.
Add an API Gateway to the Lambda
Ok, that’s great! You have Lambda that you can trigger from the AWS console, that sends an email to you. But how can you trigger it from the outside world? You can’t. Yet. Let’s change that.
To be able to call the Lambda with an HTTP post, we must add an API Gateway to the Lambda.
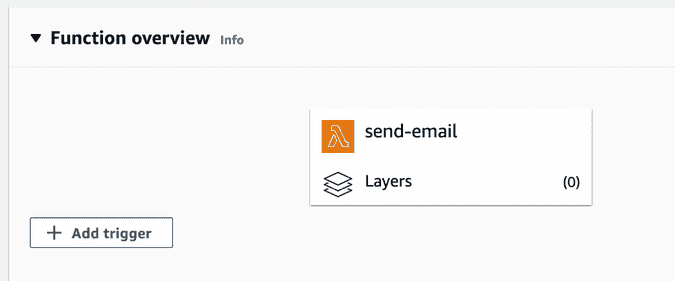
Go to the page of your Lambda. On the top of the page, there is a button that says + Add trigger. Press that.
In the dropdown, select API Gateway. Under API type select HTTP API and under Security select Open.
Click Add to add your HTTP Gateway.
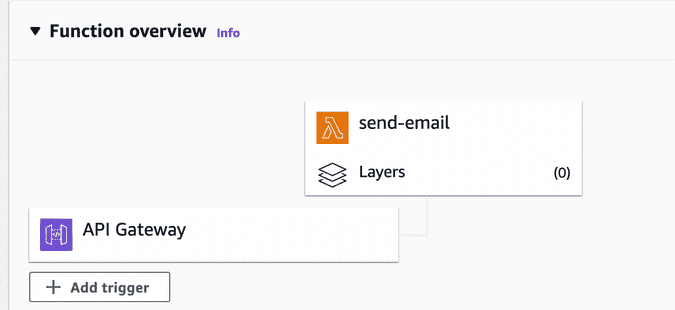
Now you can see that HTTP Gateway is added as a trigger in your function overview.
Click that big API Gateway button to go to the configuration.
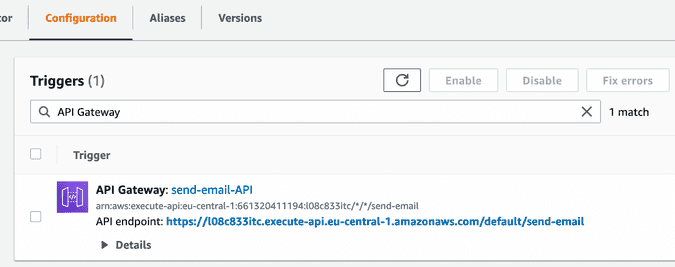
Here you can see the API endpoint. Try to click it and see that it will trigger your Lambda. You should now have a new email in your inbox.
The next step is now to make it possible to send some data to Lambda. The user must be able to give his name, message, etc. So this feels like an HTTP Post only. Click the send-email-API link (this could be named slightly differently for you if you named your Lambda differently) in the Configuration area of your Lambda. This opens a new tab with the configuration of the API Gateway.
The first thing we’re going to do here is to restrict the API Gateway to only trigger the Lambda on HTTP Post. Click the Routes link under Develop in the menu to the left. Here you’ll see the current configuration which accepts ANY HTTP method.
Press ANY and then the Edit button in the top right. Now you’ll see a dropdown where you can change the method to POST.
Now to test your Lambda, you must make a HTTP Post call. I recommend using an HTTP Client for testing this. Personally, I prefer Insomnia. Some people like Postman.
A successful call looks something like this. As you can see, I post a JSON structure containing the data like name, message, and email.
Now we can send data to the Lambda, but the Lambda doesn’t use the data we send. Let’s change that!
Access data in the Lambda from the API Gateway
Let’s revisit the code of our Lambda function that we have currently deployed.
var aws = require("aws-sdk")
var ses = new aws.SES({ region: "eu-west-1" })
exports.handler = async function (event) {
  var params = {
    Destination: {
      ToAddresses: ["YOUR-EMAIL"],
    },
    Message: {
      Body: {
        Text: { Data: "Test" },
      },

      Subject: { Data: "Test Email" },
    },
    Source: "YOUR-EMAIL",
  }

  return ses.sendEmail(params).promise()
}
The event parameter in the handler function contains all data sent to the Lambda. As you can see we don’t read from that currently. Let’s change that.
What we want to do is to show the name, message, and email in a nice way. This data is available on event.body. Even though we sent this data as a JSON structure, it will actually be a string. To access each individual field of the JSON structure, we must first parse it.
const body = JSON.parse(event.body)We parse the string event.body and put it in the body variable. Now we can access for example name like this:
body.nameLet’s see how this could look:
var aws = require("aws-sdk")
var ses = new aws.SES({ region: "eu-west-1" })
exports.handler = async function (event) {
  const body = JSON.parse(event.body)
  var params = {
    Destination: {
      ToAddresses: ["YOUR-EMAIL"],
    },
    Message: {
      Body: {
        Text: {
          Data: `Name: ${body.name}, Email: ${body.email}, Message: ${body.message}`,
        },
      },
      Subject: { Data: `Email from ${body.name}` },
    },
    Source: "YOUR-EMAIL",
  }

  return ses.sendEmail(params).promise()
}
Now we get an email with the whole message:
Post data from the form to your Lambda
Remember the form at the beginning of this article? I told you we would complete it at the end of the article, and I’m a man of my words. Here is the code:
import { useRef } from "react"

async function sendForm(name, email, message) {
  await fetch(
    "https://l08c833itc.execute-api.eu-central-1.amazonaws.com/default/send-email",
    {
      method: "POST",
      mode: "no-cors",
      headers: {
        Accept: "application/json",
        "Content-Type": "application/json",
      },
      body: JSON.stringify({
        name,
        email,
        message,
      }),
    }
  )
  alert("email sent!")
}

function ContactForm() {
  const name = useRef(null)
  const email = useRef(null)
  const message = useRef(null)
  return (
    <div>
      <form
        onSubmit={(e) => {
          e.preventDefault()
          sendForm(
            name.current.value,
            email.current.value,
            message.current.value
          )
        }}
      >
        <input type="text" name="name" ref={name} placeholder="name" />
        <br />
        <input type="text" name="email" ref={email} placeholder="email" />
        <br />
        <textarea name="message" ref={message} placeholder="message" />
        <br />
        <button type="submit">hello</button>
      </form>
    </div>
  )
}

export default function App() {
  return <ContactForm />
}
Let’s try it out.
Note that this is a very minimalistic form. You’ll probably want to do some adjustments to make it production-ready.
Next steps
Congratulations on building your contact form with Lambda functions. Now you might want to automate the deployment of the Lambda. Check out my article How to set up an AWS Lambda and auto deployments with Github Actions

