How to set up an AWS Lambda and auto deployments with Github Actions
I love Netlify for hosting webpages because it auto deploys my site whenever I push a new commit to the GitHub repo.
However, Netlify is mainly for static frontend apps. When you want just a simple backend-feature, like handling form posts, or payments, then setting up an AWS Lambda can be a good fit. Learn how to set up a contact form with AWS Lambda here
But Amazon doesn’t provide such smooth dev-experience as Netlify out-of-the-box. AWS thinks it’s a good idea to manually upload zip-files through a web page. Really?
But we are hackers and we can implement a nice dev-experience for ourselves. For free! We’re going to automatically deploy an AWS Lambda function from Github with Github Actions.
In this guide, you’ll learn:
- How to create a Lambda with AWS console
- How to write a hello-world app for your Lambda
- How to configure a Github Action to automaticly deploy the code in your Github Repo to the Lambda whenever you push code.
What you are going to need
- An AWS account.
- A Github account. A free account is enough for starting. You’ll get 2000 build-minutes of Github Actions per month which is enough for smaller projects.
Set up the Lambda with AWS console
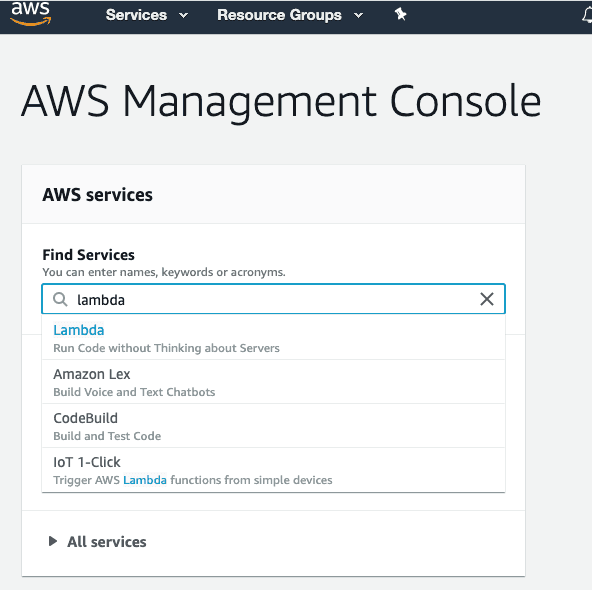
First, go to the Lambda page inside AWS by searching for Lambda.
Then, create a new function. (a Lambda is a function)
Now give the function a name. I chose my-function. You don’t have to do any other changes, just use the defaults.
Now a new function is created and you are redirected to the console page for your newly created Lambda function.
You can test the function by pressing the test button in the upper right. This is the only way to run the function right now. Most likely you want to add a trigger, like an API gateway so you can access the funtcion from a web app, but this is out of the scope for this guide. Hit me up on Twitter if you want me to do a follow-up post on this subject.
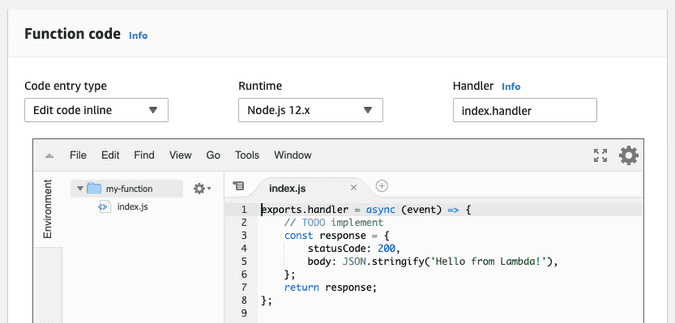
If you scroll down a bit on the page you’ll see the code for your function. It’s just a hello-world app.
You can edit the code for you function here. But for non-trivial functions you want versioning of your code with Git. This is why you are reading this guide. In the next step, we’ll create a GitHub repo that automatically deploys code for this Lambda function.
Create the Github Repo that you’re going to deploy from
But before you can configure a GitHub action, you need to create a GitHub repo for the Lambda.
You already know how to do this. If you don’t, check out this guide how to create a Github repo
Then create a new node project (and push the code to the Github repo when you’re done).
mkdir my-function
cd my-function
npm init -y
All you need for now is one JS-file in this repo: index.js. You can use the code generated for your Lambda but make some minor changes so you can see that the code actually changes when you deploy it. This is my suggestion, feel free to copy/paste it:
exports.handler = async (event) => {
  const response = {
    statusCode: 200,
    body: JSON.stringify("Hello from Lambda and Github!"),
  }
  return response
}
This code will always send a JSON response containing a string with a nice message.
You can later easily extend this app with NPM-dependencies because you have initialized it as an NPM app containing a package.json file.
Deploy the Lambda function from Github with Github Actions
Ok, now you both have the Lambda setup, and a repo containing the code you want to use for the Lambda. Now we are going to make it possible to deploy the Lambda function from Github.
You are going to use Github Actions for this. Github Actions is a CI/CD that you can use for building, testing and deploying your code. The nice thing with this is that it’s built into GitHub. You don’t need to signup for another service for this. It’s actually already there, but you might not have noticed. Go to the page of you repo in GitHub and you’ll see an “Actions” tab.
In the Action page, you can get started with a bunch of pre-built workflows. No workflow does exactly what we wanna do, so press the “set up a workflow yourself” button.
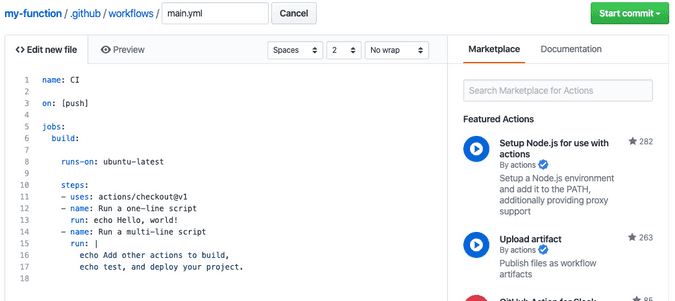
Now, you’ll see a page where you can edit a file called main.yml inside the .github/workflows/ folder. You could also create this file from your editor and commit it if you prefer.
Remove the template code and replace it with the following (I’ll describe what it does after the snippet):
name: deploy to lambda
on: [push]
jobs:
  deploy_source:
    name: build and deploy lambda
    strategy:
      matrix:
        node-version: [12.x]
    runs-on: ubuntu-latest
    steps:
      - uses: actions/checkout@v1
      - name: Use Node.js ${{ matrix.node-version }}
        uses: actions/setup-node@v1
        with:
          node-version: ${{ matrix.node-version }}
      - name: npm install and build
        run: |
          npm ci
          npm run build --if-present
        env:
          CI: true
      - name: zip
        uses: montudor/action-zip@v0.1.0
        with:
          args: zip -qq -r ./bundle.zip ./
      - name: default deploy
        uses: appleboy/lambda-action@master
        with:
          aws_access_key_id: ${{ secrets.AWS_ACCESS_KEY_ID }}
          aws_secret_access_key: ${{ secrets.AWS_SECRET_ACCESS_KEY }}
          aws_region: eu-west-1
          function_name: my-function
          zip_file: bundle.zip
Ok, what does all this code do? Let’s break it down.
First, we define the name of this action. You’ll use this to identify the workflow if you have many. Next, we define trigger with on: [push]. This workflow will run anytime you push code to the repo.
We only define one job called build and deploy lambda. It uses node version 12.x and it runs on the latest version of Ubuntu. Every time the build starts you’ll get a fresh install of Ubuntu.
The main part of the config is under the steps: key. Each step starts either with a uses: or a name:. I’ll go through all the steps here:
actions/checkout@v1This step checks out the code from a Github repo.Use Node.js ${{ matrix.node-version }}This step installs node on the fresh Ubuntu machine.npm install and buildThis step runsnpm ciand thennpm run build. This is useful if you want NPM dependencies in your Lambda in the future.zipzip down everything to a file calledbundle.zipdefault deploydeploy the newly createdbundle.zipto the Lambda namedmy-function(change the name if you chose a different name when you created your Lambda)
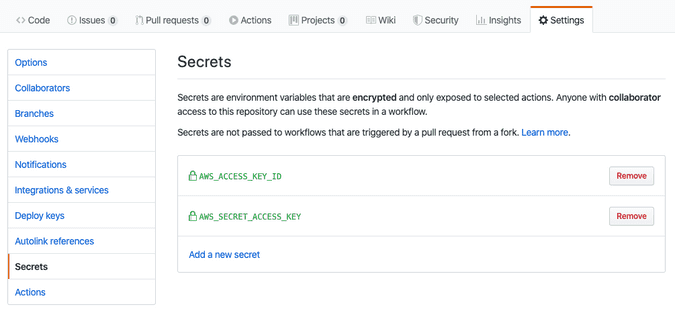
In the script we reference secrets.AWS_ACCESS_KEY_ID and secrets.AWS_SECRET_ACCESS_KEY. The reason we don’t just hardcode the keys here is because of security. Github has a built-in system to manage keys that we’ll use. Go to Settings->Secrets in your Github repo and then add the secrets there.
But where do we get those secrets from? It’s inside your Amazon account.
Go to IAM page in your Amazon account. press users, and select your user. Press security credentials. Then use one of your existing access keys and secrets, or press “Create access key” to create a new one.
Then add the keys to your Github Secrets.
Now you are good to go. Commit and push the changes and the build will automatically start. Go to the Actions tab again to see the status.
Now when you go back to your AWS Lambda console and refresh it, you’ll see the code from your Github repo in there! And every time you push new code, it’ll be auto deployed.
This app can now be extended to use NPM dependencies, multiple files, unit-tests, and everything you need for a real-world app. What will you create?
Follow me on Twitter to get real-time updates with tips, insights, and things I build in the frontend ecosystem.


