Collect form data without a backend in React (using hooks!)
Your app is a frontend app without any backend. And now you need to create a form that collects data from the user. You are looking for a simple way to collect data without spinning up an AWS server and databases.
Zapier supports something they call “webhooks”. This way you can push data to a REST endpoint and connect it to any data source with Zapier. In this post, you’ll learn how to create a form with React to collect data and post it to Zapier.
In this post you’ll also learn:
- How to create a form in React using hooks
- How to hook it up to a REST endpoint where you can access the data.. .without the need for a server
- Error handling for your form — it’s boring but needed
We’ll not use any existing libs, but just code everything from scratch. Because sometimes you just want something simple without bloating the package.json
Create a dumb React component with a form
First, you need a React component. We use a functional component because we are going to add hooks later. Let’s just add a send button on it for now:
function FeedbackForm() {
  return (
    <form>
      <button type="submit">Send it!</button>
    </form>
  )
}
Now let’s add the input fields. We must remember to add <label/> to the fields. Having labels is a must to make the site accessible to everyone. It’s good for your users and it’s also good for SEO because Google rewards accessible sites.
function FeedbackForm() {
  return (
    <form>
      <label htmlFor="comment">Your question or comment</label>
      <textarea name="comment" />
      <br />
      <label htmlFor="email">Email (optional)</label> <br />
      <input type="email" name="email" />
      <br />
      <button type="submit">Send it!</button>
    </form>
  )
}
Now we are done with the first version of the React component with the form. It doesn’t do anything yet. Nothing happens when you click “Send it!“. Let’s fix that.
Post the data
When you just need someplace to post the data and you don’t have a backend, Zapier is an option. It’s free and it can send the data to lots of different data sources. And most importantly: it’s super quick to set up, and doesn’t require any dependencies to your project. You just get an URL to post data to. I think that’s awesome.
First set up an account on Zapier, then press “Make a Zap!” to create a zap. Select the webhook integration as the trigger and then select “Catch Hook” when you get an option in the next step. This will give you a URL to post to. It looks something like this: ”https://hooks.zapier.com/hooks/catch/abc/123/”. You will use this URL to post some test data, and then Zapier will catch it and use it in the next step of the setup process. We’ll use the form we just created to post data to the URL.
The quickest way to plug the URL into your form is just to hardcode it into the JSX:
<form
  action="https://hooks.zapier.com/hooks/catch/abc/123/"
  method="post"
></form>
This is just a temporary implementation to test the webhook. We’ll improve this in the next step. Now you can post data to Zapier to continue the setup.
The next step in the Zapier setup process is to configure an action which describes where to post the data to. I used the airtable integration. But there are lots of other integrations to choose from like email and Google spreadsheets.
After you are done configuring the Zapier hook, don’t forget to enable it by clicking ON.
Post data without a full refresh
Back to the React code.
Now when you press the submit button, it will do a post to your Zapier integration, but it will also do a full refresh, taking your user away from the site. This is usually not what you want. So let’s make the form even smarter than this. We’ll do the form-posting using Javascript instead of just HTML.
To make the HTTP POST using Javascript we’ll use fetch. This is supported by most modern browsers (not IE) so you don’t need to install any dependencies. If you need to support IE you’re going to need a polyfill or an HTTP library such as axios or superagent instead.
First, create an onSubmit handler with a callback function on the form:
<form onSubmit={submit}>Also, you can remove the method and the action attribute on the form.
Next, let’s implement the callback function that I named submit. Put this code anywhere inside the component:
const submit = (e) => {
  e.preventDefault()
  fetch(`https://hooks.zapier.com/hooks/catch/abc/123/`, {
    method: "POST",
    body: JSON.stringify({ email, comment }),
  })
}
Change the URL to the URL you got when you set up your zap earlier.
The API for fetch is quite straight-forward. It takes a URL as first arguments, and then an object with the configuration as the second argument. Here we specify that we want to do an HTTP POST and what data the body should contain. We put email and comment in the body. We’ll fetch these variables from the input fields. And the way to do that is to make the component a controlled component. Instead of keeping the state inside the DOM (which is the default with input fields) we’ll maintain the state as React state. And this is what we are going to use hooks for. Specifically the useState hook.
First, let’s import the useState hook.
import React, { useState } from "react"And then you’ll use it like this inside your component
const [email, setEmail] = useState("")
const [comment, setComment] = useState("")
useState can only handle one state item at the time. This is why we call it two times: one for email and one for comment.
useState takes one input parameter which is the default state. We just want an empty string both for comment and email because we don’t want anything pre-filled.
The useState hook returns an array with two items. The first is a variable where you can access the state. The second is a function where you can set the state. Now let’s use the state and the state setter in the input fields:
<textarea
  name="comment"
  value={comment}
  onChange={(e) => setComment(e.target.value)}
/>
and
<input
  type="email"
  name="email"
  value={email}
  onChange={(e) => setEmail(e.target.value)}
/>
This is our complete component so far:
import React, { useState } from "react"

function FeedbackForm() {
  const [email, setEmail] = useState("")
  const [comment, setComment] = useState("")
  const submit = (e) => {
    e.preventDefault()
    fetch(`https://hooks.zapier.com/hooks/catch/1239764/oo73gyz/`, {
      method: "POST",
      body: JSON.stringify({ email, comment }),
    })
  }
  return (
    <form>
      <label htmlFor="comment">Your question or comment</label>
      <textarea
        name="comment"
        value={comment}
        onChange={(e) => setComment(e.target.value)}
      />
      <br />
      <label htmlFor="email">Email (optional)</label> <br />
      <input
        type="email"
        name="email"
        value={email}
        onChange={(e) => setEmail(e.target.value)}
      />
      <br />
      <button type="submit">Send it!</button>
    </form>
  )
}
Now we use JavaScript to post the data. But the problem is that when the user has posted the data, nothing happens. We need to show a “thank you for your message” box to the user when he/she has posted the data.
Make it say thank you after pressing send
Now let’s make it a little bit smarter. After pressing send, we want it to hide the form because the user no longer cares about the form. We also want it to display a “thank you”-message instead.
To do that we need a way to keep track of if the form has been posted or not. We’ll do that by creating the state isSent with a hook:
const [isSent, setIsSent] = useState(false)You already know how the useState hook works from last section (if not scroll back up :) ).
Now let’s use the isSent state. Let’s set the state after we have successfully posted with fetch:
const submit = (e) => {
  e.preventDefault()
  fetch(`https://hooks.zapier.com/hooks/catch/1239764/oo73gyz/`, {
    method: "POST",
    body: JSON.stringify({ email, comment, key: feature }),
  }).then(() => setIsSent(true))
}
fetch returns a Promise which enable us to call .then on it. .then is run after the Promise is completed which it is when the HTTP call is completed.
Next step is to hide or show the form based on the isSent state variable. There are many ways to do it. I like a simple solution like this:
const thankYouMessage = <p>Thank you for your input!</p>
const form = <form>...</form>

return {isSent ? thankYouMessage : form};
Error handling
We have now implemented the happy-path! But as a dev, we must also handle the errors that can happen. Zapier can be down or the user can have a bad internet connection — many things can fail. That’s fine, we can’t prevent unexpected errors. But the user should know about them.
What we’ll do is that we’ll show a message to the user informing him that there has been an error so he can try again.
Before we start coding, let’s simulate an error to check how our current solution works. This is, by the way, a very good approach to fixing bugs. Step 1 is to recreate the bug, and then when you have recreated the bug, you can fix it. This way it’s very clear that the bug actually got fixed.
So how do we simulate an error? One way is to set the page in “offline” with the dev tools. Open up the dev tools by typing CTRL+Shift+I (CMD+Shift+I on Mac) and click the network tab. Check the offline checkbox.
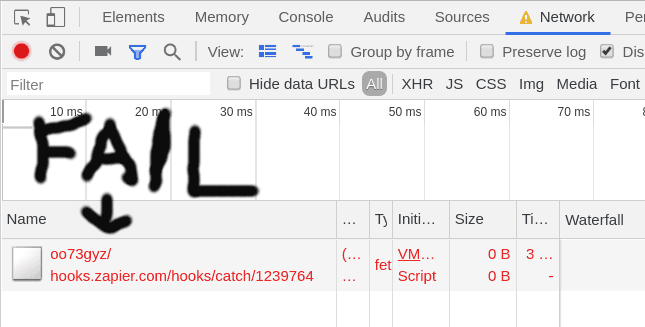
Now when you post the form, you can see that it’ll fail in the network tab.
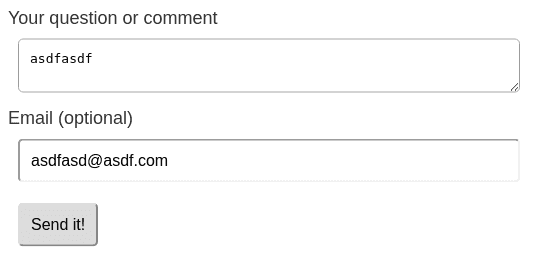
But for the user, nothing happens. He still sees the same form:
Ok, now that we have simulated an error, let’s fix it.
In the fetch call we can add a catch:
fetch(`https://hooks.zapier.com/hooks/catch/1239764/oo73gyz/`, {
  method: "POST",
  body: JSON.stringify({ email, comment, key: feature }),
})
  .then(() => setIsSent(true))
  .catch(() => alert("There was an error, please try again"))
The catch is run every time there is an error inside the fetch call. What we do here is that we just show an alert with a message. You could, of course, do a more modern solution showing the text inside the form, but I’ll leave that as an exercise to you :)
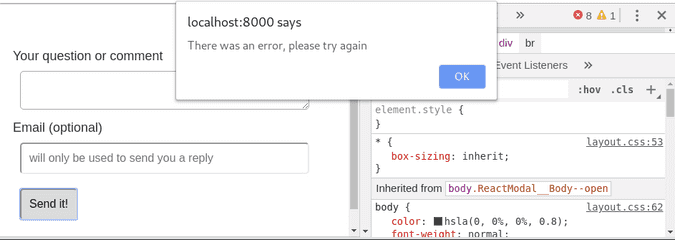
Now when we post the form in offline mode the user gets a message to try again:
Nice! We have some super simple error handling. Now you can use this form to collect data from your users.
Follow me on Twitter to get real-time updates with tips, insights, and things I build in the frontend ecosystem.


