Getting started with React SSR
React SSR (server-side rendering) gives better SEO (search engine optimization) and a feeling of quicker loading speeds.
It sounds cool but how to get started? I will show you!
How does React SSR work?
First, let’s remind us how things work when we only render on the client without server-side rendering.
Without SSR[
](https://d4jyn86spyrm8.cloudfront.net/universal2-1.png) 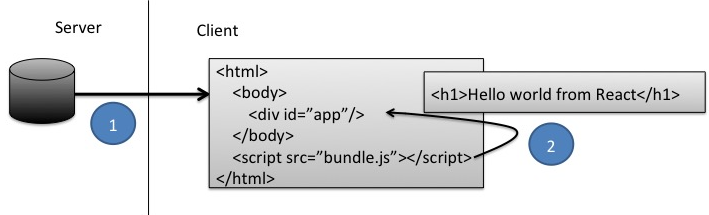
-
The server generates a skeleton HTML page with an empty div-tag, and the Javascript bundle with the React components in a script-tag.
-
When the page is loaded on the client, React generates HTML from the React components, and puts it inside the div-tag.
With SSR

- With SSR, the server generates an HTML page like before. But this time the server also renders the React component and injects it into the div-tag before sending it to the client.
- When the page is loaded on the client, the React component is already there. Client side React renders the components anyway, and puts it inside the div tag again.
How to implement SSR
My example code assumes a Node.js backend. I have created a Github repo with an example implementation based on this tutorial that is useful to run and experiment with while reading this tutorial.
1. Transpile the server code.
Your server will need to understand JSX code, just like your client does. The best way to do this is to transpile your whole backend code. You have two options for this:
- Babel only
- Babel with webpack
If you want to use Webpack, I suggest that you read my step-by-step tutorial here. If you decide to use babel, you can use babel-cli
2. Render to string
On the client, the function render is used to render the React component to the DOM. When rendering on the server, you will use another function called renderToString (docs).
This function is very simple. It takes a React root component as input, and outputs a String with HTML. An example usage looks like this:
const reactHtml = ReactDOMServer.renderToString(<App />)Note that this function takes a JSX tag as input and it is run from server side. This is the reason you need to transpile the server side code as described in previous section.
In the next step I will show you where to use this function in your application.
3. Inject the generated HTML on your server-side rendered page
The renderToString function is used inside your controller on the backend. When using node/express it looks something like this:
function handleRender(req, res) {
  const reactHtml = ReactDOMServer.renderToString(<App />)
  const htmlTemplate = `<!DOCTYPE html>
<html>
    <head>
        <title>Universal React server bundle</title>
    </head>
    <body>
        <div id="app">${reactHtml}</div>
        <script src="public/client.bundle.js"></script>
    </body>
</html>`
  res.send(htmlTemplate)
}
In this example, we just put the boilerplate HTML in a string. If you use a template engine in your app, I suggest you use that.
4. Make sure you don’t reference window or document
Your React components will now be rendered by your node backend. And your node backend doesn’t have the window or document global variable. That could lead to errors like this on server side:
window is not definedIf you get a similar error, you can put the code referencing the missing variable in an if statement like this:
if (typeof(window) !== "undefined") {
    window.localStorage = ...
}
That’s it!
As I said earlier, a fully working project running code from this post can be found in this Github repo. Clone it and start experimenting with it right now! And if you like it I encourage you to star it in Github :)
Follow me on Twitter to get real-time updates with tips, insights, and things I build in the frontend ecosystem.